There is nothing worse than arriving at the office with hair that looks like it has been dragged through a ditch. Here is our tutorial that explains how to avoid it.
Hello, fellow motorcycle riders. I just wanted to go through how to maintain your hairstyle while wearing a motorcycle helmet, especially when you have hair that is medium-length or longer.
In the past, people would just put it in a ponytail (braided hair), well, the problem with this is I’ve never known how to do a ponytail and to do a decent one someone else has to do it for you.
If you don’t have a partner you’re probably not going to mess with that. Ther are also things called hair gloves which are these tubular things that have snaps on one side that you would throw your hair back and snap it inside this long tube.
The problem is those tubes still leave five to six inches of your hair hanging out the bottom which is still gonna flail in the wind and especially if you have long hair which most women do.
Anything that flails in the wind is going to be all tangled up at the end of a few miles, so what are you supposed to do?
Other bike riders have taken hair bands and put them at various links in a ponytail, the problem with that is your hair tailors and gets thinner towards the ends.
The chances are your hair bands at the end are going to fall off on the road at some point and then you’re gonna still have 6 inches of hair flailing around in the wind getting tangled.
Here’s what I do and this works. It took me a while to figure this out but it works with just a $1 bandana.
First of all, take your hair and just throw it back as if you were going to put a band into your hair and put a hairband into your hair, something you probably do every time you put your motorcycle helmet on.
Now go get yourself a $1 bandana roll the ends in together until you get a long band then place it below that hairband at the back of your head then in the front just tie it off like you would a shoe but don’t go too tight.
Image Taken From https://www.youtube.com/watch?v=WzxqDQsxoSU
Take the free ends and put one over and one under on the other side this will make it where the wind resistance won’t loosen it.
Image Taken From https://www.youtube.com/watch?v=WzxqDQsxoSU
At the back, your hair should be underneath the bandana being held down. Give your hair a few twists with your finger and wrap it under the bandana this should stop the back of the hair flapping around in the wind when you are out on your bike.
Image Taken From https://www.youtube.com/watch?v=WzxqDQsxoSU
This will last you 10 miles, a hundred miles, 200 miles it doesn’t matter. If you have a cap or a half based helmet or a full-face helmet this will hold forever, the best part is it will only take you about 30 seconds to do this.
Once you reach your destination you can just remove the bandana and you are good to go. This takes literally seconds to do and you will not experience one single tangle again on your motorcycle.
Some people prefer to wear a headscarf which will cover more of the scalp of your head so I thought I would include a short tutorial on how best to tie a headscarf.
How to Tie a Biker Head Scarf
For bikers, head style is for those that are out on the open road and the main concern is keeping your hair out of your face, but just because you’re playing it safe does not mean that your style needs to go out the window.
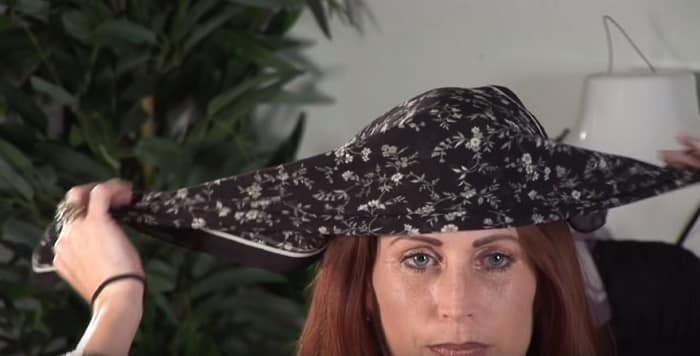
First, bring the scarf up around the back of your head and right above your brow line, this should create a triangle in the back.
You can then take both ends and tie it once and twice and you’re ready for the open road and stylish for those of you with long hair and you need to secure that as well you may want to tie your hair back so that you say stylish and safe.
Related Questions
Is Wearing A Motorcycle Helmet Bad For Your Hair?
Anyone who wears a helmet for long periods can have issues with their hair. It doesn’t matter if you are wearing your helmet for legal reasons like a motorcycle or you take part in a contact sport prolonged wearing of a helmet can cause problems.
Traction Alopecia
Constant pulling or tension being put on your hair can cause damage to hair follicles over a period of time. This called traction alopecia.
Traction alopecia can often be seen in those who wear tight helmets or a bandana, hair braid, ponytails for prolonged periods.
This happens when someone wears a motorcycle helmet that is too tight for them, to avoid hair loss when wearing a motorcycle helmet it’s important you purchase the right size helmet for your shape of the head.
The constant pulling of your hair, especially from the roots, can cause permanent hair damage so again having the correct fitting helmet is very important.
One way to avoid this is too not to tighten the helmet too much, keep it tight enough so that if you had an accident your helmet would still be tight enough not to fall off but loose enough so that your hair follicles are not pulling all the time.
Bacteria from sweat can cause issues, especially if you live in a state like Florida where the temperatures are a lot higher. Bacteria can build up especially in areas where you have the most padding which can over time, make your helmet a little smelly.
It’s important to keep the interior of your helmet clean so regular cleaning of your helmet interior is essential. There is an antibacterial solution available that you can use for the interior of your helmet after every ride. I use Neutramist Helmet Sanitizer available from amazon, I find this to be good for those people who like me suffer from a sweaty head after riding.
Scratching your motorcycle windshield can be really easy to do. Some bikers would change the windshield but I found a simple way to remove the scratches, and you know what? It’s really simple to do.
How To Remove Scratches From Plastic Motorcycle Windshield? There are no special tools needed to remove scratches from a plastic motorcycle windscreen. All you need is a clean towel, some water, sandpaper and a plastic rubbing compound.
Hey, guys today I’m going to show you how you can easily and rather inexpensively remove scratches from your motorcycle windscreens. I live in a state where we get tons of bugs, especially at night. Frankly, some of them have freaking armor on them and my motorcycle screen gets beat up.
Every few years I put a new screen on it because I don’t like having to look through scratches, the same thing goes with home visors. If I get a big scratch and I can’t polish it out, or if it’s just old I’m going to replace it.
However, if it’s in relatively good shape it’s kind of like putting a brand new tire on and getting a nail, you can fix it.
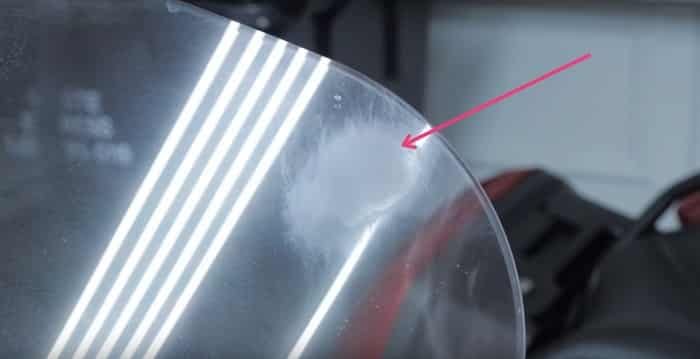
Stupid me, I was walking past my motorcycle the other day with a screwdriver in my hand and I just glazed it, unfortunately, it put a nice little scratch right up in my line of vision.
The rest of the windscreen is not ready to be replaced yet so I decided to go ahead and fix it, but you could do the entire screen if you really wanted to. This method is going to work for anything from mild to moderate scratches, it’s not going to work for any kind of crack or really a heavy gouge.
What we’re going to do is simply mess up the rest of the shield around the scratch to bring it down to its level, and then fix what we’ve messed up. We’re going to do that using sandpaper and some metal polish.
Motorcycle Windshield Repair Kit
As I said there are many ways to do this, there are specialty products and kits that you can buy specifically to do this, some are all compounds so you don’t have to use sandpaper, but you know what? this is really easy and cheap to do.
This is something you can pick up starting from scratch and I’m going to show you how to do it assuming you have nothing with a trip to Walmart for about thirty-five bucks, it beats a hundred and fifty dollars for a new windscreen.
The first thing we’re going to start with is relatively aggressive sandpaper, start with 800 wet dry paper. We are only going to be using it wet, it’s going to be wet at all times and we do need to pre-soak them. You’re going to put them in a pan of water and let them soak for at least ten minutes, and then You’re going to keep it wet while You’re doing the sanding.
If the scratches are fairly mild and it will be fairly obvious if they are, and it’s not what you would call a gouge or a deep scratch you can start off on the higher side with 800 sandpaper. If yours is more aggressive, if it’s a pretty deep scratch start with 600 sandpaper.
The easiest way to tell is to drag your fingernail across the scratch if you barely feel it start with the 800 sandpaper, if you can definitely feel it drag on your nail then the scratch is deeper so start with the 600 paper.
It’s going to save you some time because it’s going to be more aggressive and help take down that surrounding area a little faster. The whole procedure is probably going to take you half an hour, which might take you 15 or 20 minutes, not including the soaking time.
After you get done with the sanding, which is basically going to mess everything up evenly the scratch is going to be removed because it’s going to be so scratched around it, it all looks the same. Once you have sanded with the 800 paper you can move onto the 2,000.
The 2,000 paper is going to make it look still bad, but it’s going to go from looking very scratched to just cloudy. It’s going to make it a lot smoother.
You are not going to feel like it’s gritty but it’s still not going to be clear. This is only going to take us a few minutes of hand sanding. The 2,000 sandpaper is about the limit that you can get on a physical paper product, beyond that you have to go to compounds.
The next thing up would be what’s called rubbing compound, that’s typically used in the automotive field for polishing paint and removing deep scratches. You could think about it as a kind of twenty-five hundred grit. We’re going beyond that and we’re going to what’s called metal polish.
It comes in many different brands, you can think of this as more of a 3000 or even 3500 grit, it’s superfine. It feels smooth in your hand but believe me, there are fine abrasive particles in it. To get the best from rubbing compound you will need something electrically powered, you do not want to be trying to do this by hand as it will take you forever.
You can get one of those little buffing units that attach to your power drill, just be aware you must regulate the speed because you cannot go fast from polishing any kind of Lexan or poly glass, it will melt.
Heat is your enemy so if you choose to do that put it on its lowest speed. If you have a drill that has two different settings, one for drill and one for the driver, put it on drive and that will keep it nice and slow.
I use an orbital polisher, you can get one for around 20 bucks at Walmart, it works really well and is super easy. You don’t need anything fancy, you don’t need a porter cable polishing machine.
You’re just going to be using a little bit of the edge of the orbital polisher and applying gentle pressure using the metal polish, it will be completely clear in just a few minutes.
Let’s Get Started
Now you have all the tools to remove the scratch follow these simple instructions.
Step 1. Let’s get started by taking out a sheet of sandpaper and soak them in a pan of water until they are nice and soaked.
Step 2. If you have a spray bottle fill it with water, this will save you continually wetting your sandpaper. If not you’re just going to have to keep soaking your papers.
Step 3. Start by using small circles, your just going to sand in the area around the scratch until it disappears and until the entire area looks uniformly scratched. This should only take you a few minutes.
Step 4. What you should have now is a nice even area of really crappy looking windscreen. What you want to make sure is you don’t have any remnant of the original scratch left, if you can still see the original scratch continue until it has all gone. Use your fingernail again and if you don’t feel any drag you are good to continue to the next stage.
Step 5. Use a clean towel and just wipe it off, make sure there’s no debris. Now you’re going to move on to the 2,000 grit do the exact same thing and hit all of the areas that you just did, it’s going to get a little bit larger of an area but it’s not going to look as bad, it should just look more cloudy and less scratchy.
Again you should keep it wet, don’t apply too much pressure but just enough to keep the paper from skipping around. You should be able to feel it getting a lot smoother, it should feel just like a clay bar pulling out that first round of gunk.
You can even hear it as it hits the areas that are smoother so you just want to go until it’s an even surface and until you’re not feeling any differences in the areas around the original scratch.
It should only take you a few minutes to finish and again it should look evenly cloudy. At this point, you shouldn’t be able to see any of the original scratch, only a cloud around the original scratched area. Again use your fingernail to see if you can feel the ridge but at this point, it should be all gone.
Step 6. It’s now time for the super fine stuff. When I purchased my polishing attachment it came in a six inches and a ten, in the interest of not making a huge mess I’m stepping down and using my six-inch polisher instead of the ten, either one will get the exact same results.
You should use the outer edge of the disk with only slight pressure, just let it do its thing. This should not be a high-speed unit by any stretch of the imagination, just make sure your pad is on evenly.
Apply a little compound to the outer edge of the disk and just work it in. (I use NOVUS 2 Fine Scratch Remover available from Amazon.com). Continue with the compound and polishing disk until it’s perfectly clear, you want to make sure it doesn’t go dry so stop and reapply compound as needed.
Every now and again wipe off the compound from your motorcycle screen to check your work. If you can see an are of fine scratches or the area is still coudy continue gently with the compound until finally the scratch is gone and the screen is clear.
Will this method work 100% of the time every time? No, but it’s worth a try when you consider a new screen can cost up to $150 or more and for the sake of some sandpaper and some compound I think it’s worth giving it a try.
There are nine types of motorcycles that a beginner should consider before buying a bike. There is the Adventure Bike, Sport Bikes, Cruisers and many more.
The Nine Types Of Motorcycles A Beginner Should Consider.
Today we’re going to talk about some of the various categories that exist in today’s motorcycle market. We are going to help you figure out what type of motorcycle you should get as a beginner.
We are going to break down those classes so you know exactly what type of bike you might want to look at when you walk into a motorcycle dealership.
I’m going to be talking to you about some of the features of each of these bikes that help them be good at a certain task, we’re going to debate some of the pros and cons of those features of the motorcycles themselves.
My job in this article is not just to explain the features of each bike but to also talk to you about how the bike feels from an ergonomics standpoint. Keep in mind there’s a lot of you out there that might have fallen in love with a certain style of bike, for example, a sportbike.
A sports bike may look awesome, looks fast, hardcore lines and that bike might be appropriate for aggressive riders on a track day, but it’s probably not the most appropriate machine if you’re commuting back and forth to the office on a regular basis.
While we’re not intending in this article to tell you what bike is right or wrong for you, what we would like to do is give you some recommendations about what you can expect from each of these machines and how it’s going to affect the riding that you’re doing.
Remember the style of riding you might think you’ll be doing might be a lot different than the riding you actually do.
Because these bikes are constructed differently they come in all shapes and sizes, much like many riders and this means they interact with people’s bodies differently.
For example, if you are sitting on a motorcycle and your feet are firmly on the ground and you feel like you have complete control of the bike this is going to instill confidence in you right from the get-go, especially for beginners.
If you have any doubts about whether or not the motorcycle is right for you, the same way you would try on a pair of jeans or clothes before you buy them to try out the bike.
I’m not talking about a test drive, I’m talking about walking into your dealership, putting your ass in the seat, grabbing the handlebars and sit on the bike for 10 or 15 minutes to see how you feel.
We’re going to break this article down very very simply. We’re going to kick things off with street bikes. If a bike was made to roll mostly on the pavement we’re going to be talking about it in this first section.
Standard Motorcycles
Let’s kick things off with one of my favorite classes of a bike and that is the standard. Standard motorcycles usually fairly sporting machines and they’re best exemplified by having no fairing fitted. These bikes are generally fairly naked, you’ll hear that term use from time to time.
These motorcycles are not the perfect tool for any job, however, they can handle lots and lots of different scenarios with ease.
For instance, a Suzuki SV650 could very easily be taken to a track day but it’s also comfortable enough that you wouldn’t mind taking an all-day trip on this motorcycle, it’s a very versatile machine.
These bikes are updated all the time and the model that is available now may be slightly different but the size and shape of any of the new models will give you the same feel as any previous models. What you are looking for is not necessarily the models I mention here but the shape and style.
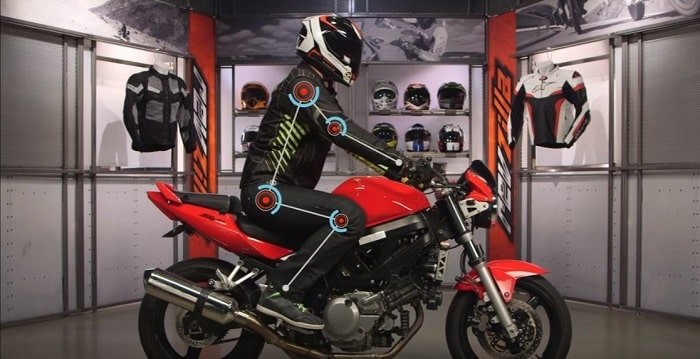
There are no surprises as to why the Suzuki SV650 style of motorcycle is going to be a do-anything machine, it’s great for new riders.
If you were to site on this type of motorcycle and grab hold of the handlebars your hands would be directly in front of you.
There’s maybe a slight drop to the handlebars which means you would have a little bit more weight on your wrist, but that’s going to benefit you as a rider because it puts a little more pressure on the front wheel which makes the bike easier to steer.
Standard Motorcycles
The other thing you’ll notice is your shoulders aren’t quite perpendicular to the ground, they’re a little bit more forward than your hips but then your feet are going to be directly underneath you. Your feet should be able to reach the ground so you have firm control of the bike.
Sport Bikes
Next up we have the sportbike. Sportbikes are patterned after road racing machines, you’ll notice how sleek and aerodynamic these bike look and that’s in part due to the plastic fairings on these types of motorcycle.
Sportbikes are good for racing if you are planning on doing a track day and you can also use them on the street too. I’d say they’re probably best used for shorter more spirited rides due to the aggressive body position, it’s hard to remain comfortable for most riders on a sportbike for a really long time.
The other reason I wouldn’t probably recommend these for a beginner unless you’re in the beginner class of sportbikes is that the larger machines like the Yamaha R6 or larger bikes generally are extreme machines and when I say that I mean that a lot of different senses.
They’re very very fast, they also have razor-sharp braking and handling which doesn’t really bode well for a beginner who might not have mastered inputs on the motorcycle. The other thing that’s really extreme on these sportbikes is body positioning.
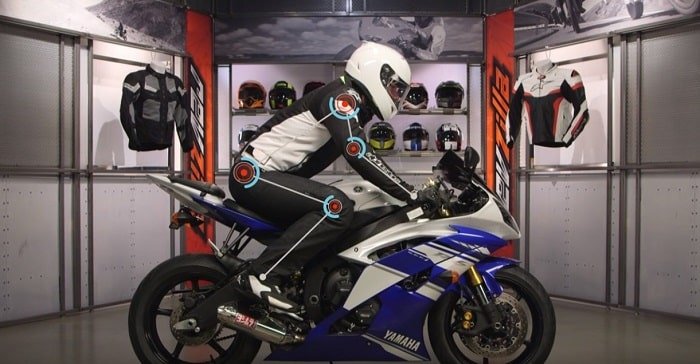
If you sit on the sports bike you will notice right away the aggressive body position.
Sport Bikes
Your hands are at or slightly below or your knees. Your shoulders are pitched forward, your ass is pushed way back as are your feet and that’s going to put you in a really aggressive tuck down position.
This is a great position if you are planning on aggressively riding or tackling a track day but if you’re just commuting back and forth from home to work for 30 to 45 minutes it’s not going to be comfortable.
That’s not to say that there are no riders out there that do it, there’s plenty of riders that commute on these types of bikes but we’re just going to say that this might not be the most appropriate machine to do that on.
Especially when you consider some of the more advanced race-style mechanics on this bike like the suspension.
For example, if you’re using this on the street and you start to hit potholes it will be transmitted back to the rider which can cause you to feel a little bit uncomfortable so the sportbike might not be the best machine for beginners.
Cruisers
This bike is arguably the antithesis of a sportbike and that is the cruiser. Cruisers are bikes built for a nice long low cruise as the name implies.
These bikes prioritize comfort over speed, now there’s a couple of characteristics about a cruiser that make them particularly good for beginner riders.
The first is that these bikes even though they have very large engines, they have very large engines that deliver very controllable power. They’re typically very forgiving for beginners who happen to make some mistakes.
One of the other things that makes them particularly suited to beginning riders is the fact that you’ll notice the front wheel is kicked out just a little bit.
The frame has a little more rake and by having that front-wheel out there it makes the steering and handling a little bit more controllable on this motorcycle. Again also forgiving to rookies who might happen to make a mistake or two now.
There’s a class of rider who might be very interested in the cruiser and that’s people who are vertically challenged. If you’re a shorter rider a cruiser is almost universally a good choice because just about every one of them across the board has a very low seat height.
This means that even if you’re not a large motorcyclist, even if you’re on a large motorcycle you’ll find yourself able to easily control the bike. These motorcycles are built for comfort, not for speed.
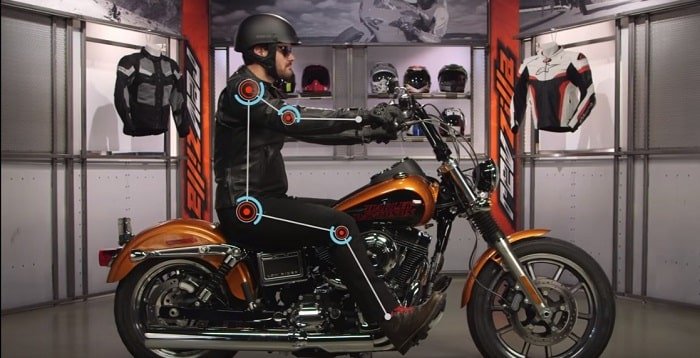
On a cruiser, you will be in a much more of a slouched riding position with your hands slightly above your shoulders. Your shoulders are going to be kind of like slouched back with your ass almost kicked out in front of your shoulders a little bit.
Cruisers
Your feet are going to have two different options. They will be either kicked out in front of you using a forward control or your feet just slightly below your hips. That’s going to be a much more comfortable riding experience.
I personally prefer the forward position when I’m riding a cruiser, I find that to be just a little bit more comfortable for me, so even among experienced riders riding the same bike, there’s not even a consensus necessarily what is right.
I’m going to kind of reiterate what we told you the first time around and that is to spend some time on a bike, sit on it, it’s not weird at all to be in a showroom or perhaps to park yourself on a used bike and just ask for 10 or 15 minutes to make sure the bike is comfortable for you.
Scooters
Now we come to the class of motorcycle that offers more miles per gallon than just about anything else and that is the scooter. Scooters are kind of interesting, scooters are offered in a variety of sizes, the smaller bikes are excellent for in town work.
If you live in an urban area and you want to just run some errands scooters are absolutely perfect.
There’s also a larger class of scooters known as maxi-scooters and those are much much bigger with more powerful engines and they can actually attain motorcycle speeds, in fact legally they’re actually classified as motorcycles.
They offer lots and lots of storage capacity and taking a really long trip on one isn’t out of the equation at all.
Scooters are built a little bit differently than a regular motorcycle, looking at one it obviously visually much different.
Lett’s go through some of the construction features that make it a little different from some of the other bikes we’ve talked about.
First, let me direct your attention to the wheels, you’ll notice the wheels are a much smaller diameter than the other bikes we’ve looked at. Generally, these contribute to the easy handling nature of a scooter, note the platform of the scooter step-through design is sort of a hallmark of this scooter.
It’s entirely different in terms of where your feet sit and really almost every other motorcycle out there on the market. There is also plenty of storage, believe it or not, there’s a surprising amount of cargo-carrying capability on a scooter, especially relative to its size.
With the exception of older scooters, almost every single one of them has an automatic transmission so if the prospect of learning to drive a manual transmission vehicle is kind of daunting for you a scooter might be the perfect gateway into the world of motorcycling.
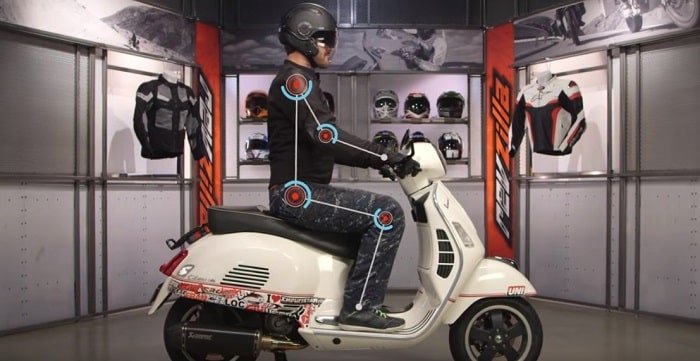
When you’re sitting on a scooter from a body position standpoint your hand bars are definitely closer to you than anything we’ve talked about so far.
Your hands are almost sitting at your knees and your shoulders are still right on top of your hips but your legs are definitely more in front of you than anything else.
If this was a motorcycle your feet would be sitting right where the engine would normally be, I think if you’ve never ridden a motorcycle before you’re not going to notice that, but for those of you that are coming of an MSF course where you’ve been practicing on a bike, getting onto a scooter might be a little of a different experience.
You do have a lot more room and you do have that clear planted feel to the ground and because these things are so lightweight you’d never feel like you’re intimidated.
The other point to make is if you are coming off an MSF course this is not to be confused with a motorcycle, you need to remember a scooter is an automatic.
Don’t grab that front lever thinking it’s a clutch because it’s actually a brake lever as you will throw yourself right over the front, other than that it’s a fun little machine you learn how to ride a bike.
Touring Motorcycle
Your touring bikes also called dressers or baggers, touring bikes are meant to carry lots of stuff at high speeds for long distances. The signifying factor that makes a bike a touring bike is a large storage often integrated right into the motorcycle.
You will notice these touring motorcycles have some huge saddlebags and the street glide we tested is actually one of the more stripped-down touring bikes you can put your money down on. A lot of full touring bikes also have a top case or top box on the back for additional storage capacity.
Because these bikes are meant to be ridden for long distances the manufacturers typically make them very comfortable for riders, and I mean that in terms of both seating position as well as appointments on the motorcycle.
It’s not uncommon at all on a touring bike to see full audio systems and navigational aids just in an effort to make a rider’s ride as good as possible.
The touring bike providing lots and lots of comforts, again these are meant to keep riders happy in the saddle for quite a while. Out of all the bikes we’ve talked about so far this is the one that’s definitely big enough to fit from my size standpoint.
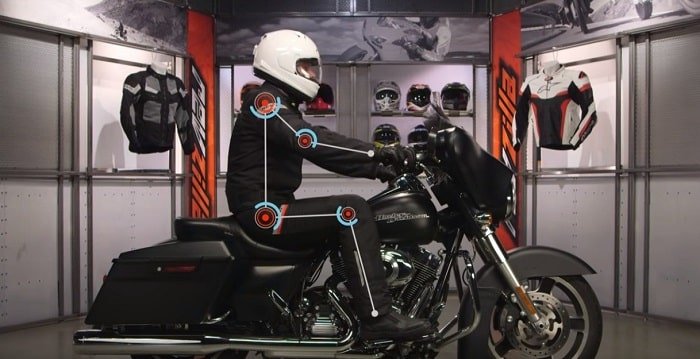
There’s plenty of room for you to move around and what you will see is a mix of two different types of body positions. From the waist up your in a very neutral position.
Your hands are out in front of you, wider handlebars with plenty of leverage and your shoulders are above your hips. This is a comfortable upright seating position which is great when you are traveling long distances.
Touring Motorcycle
From the waist down with these floorboards you have a couple of different options for where you can put your feet.
You can kick your feet out a little bit if you want to give you more stretched out for control, or you can slide your feet back and use it for more leverage as if these were mid controls.
There are plenty of options for you to move around and find what position works well for you.
In addition to the rider comfort, there’s also plenty of room at the back for a passenger so they can move around comfortably too but that’s going to bring us back to weight.
These bikes weigh around seven to eight hundred pounds, you throw a passenger in the mix and it’s a pretty heavy ride, especially considering that while I can get my feet on the ground it’s still going to be hard to leverage its back and forth if I’m not really comfortable with the machine.
We’re not here to tell you what’s right or what’s wrong for your first motorcycle and we are not going to steer you away from any type of bike but if we did this would be one of them just because of how large this is.
It’s not going to instill confidence right from the get-go for new riders and it’s heavy so not one we would recommend.
Sport Tourer
One of the other bikes I want to talk about before we move on is actually kind of a throw to a blend of motorcycles we’ve already talked about and that’s the sport-tourer. It’s a mixture of a sportbike as well as a touring machine.
Typically you’re going to give up a little bit of carrying capacity with a sports tourer, generally, they can’t carry quite as many things as a straight-on touring bike but these bikes are considerably faster than a straight touring bike.
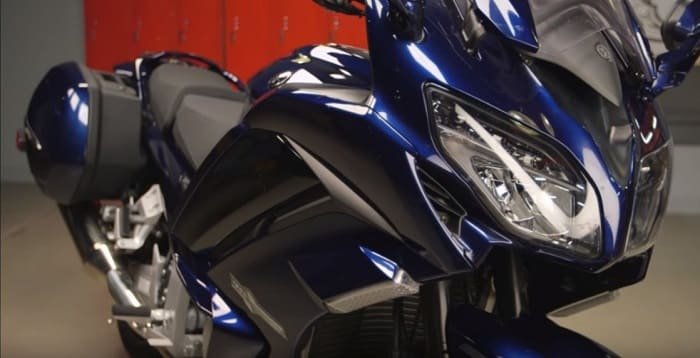
One of the other hallmarks of this breed of a motorcycle is the aerodynamic fairings. They’ll typically be very sleek looking motorcycles and the riding position is sort of middling as well.
You won’t see the full upright position but you’re also not going to be somebody on a sport-touring bike all wadded up in that uncomfortable sport position either, it sort of split the difference.
Sport Tourer
Before we move on I do want to mention something else about positioning. You may have noticed that just about every bike we’ve talked about has had a pretty neutral or intermediate riding position with the exception of the cruiser and the sportbike.
Both of those are kind of at the extreme ends of the spectrum. Most manufacturers are shooting to that sort of neutral riding position and the reason I bring that up is that it’s a very successful riding position.
The reason you see it on so many motorcycles is because so many motorcyclists are comfortable in that position, so if you do find yourself gravitating towards one of the bikes, again toward the outside ends of the spectrum whether it be sportbike or Cruiser.
I would encourage you to spend a little bit of time on one of those more intermediate bikes just to see what else is out there.
Dirt Bikes
When you say off-road motorcycle to most people the thing that jumps into their head immediately is probably something like a dirt bike. These bikes are made to tackle the roughest terrain that Mother Nature has to offer and as such, they’re constructed in a very specific way.
Let’s start with a couple of those features.
The first and probably most noticeable are the tires. You will see that they are very nobly super aggressive tires made to bite into the loose surfaces dirt bikes are typically ridden on. The other thing to notice about this bike is how tall it is.
It has lots and lots of suspension travel, it also sits very high up and that’s because dirt bikes are meant to roll over some obstacles. From trees to logs and rocks they all get in the way. Having a bike that sits up high prevents the bike from being damaged.
One of the other important parts about a dirt bike is you should know that this is a single-cylinder machine, the motor is physically very small though it is pretty powerful.
On some motorcycles, it’s kept small so the weight is kept down, when you’re wrestling a bike around off-road and you have to pick it up after you’ve dropped it after a crash, which is fairly common, in off-road riding having a lighter weight bike really can help.
There are no headlights, no key, no tail light, there’s a bunch of stuff missing on this bike that won’t make it legal to ride around on the street. When it comes to riding these things again riding off-road is really different than riding on the street.
These types of bikes are tall, I’m six foot three and I’m standing up I’m on my tiptoes on this bike. The suspension travel works great, but just keep in mind that you probably want to go to the tall end of the spectrum if you’re just learning how to ride.
Dirt Bikes
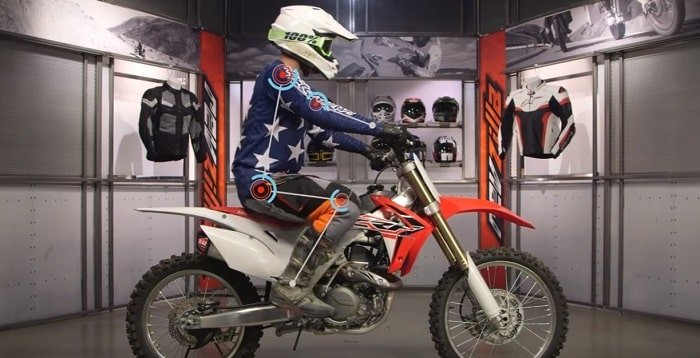
From a rider standpoint talking about the ergonomics, it’s very similar to what we talked about with a standard riding position. My hands are out in front of me, it’s definitely a wider handlebar for maximum leverage but you will see from the image that your shoulders are on top of your hips.
You would be sitting upright and your feet would be just below your hips making it very comfortable.
One thing to note with the dirt bike is it has a long flat seat and it is quite uncomfortable, but that’s okay because you will spend most your time standing up or kind of sliding back and forth.
You’re not going to sit in one position too long because you’re going to use your body as a counterweight over terrain.
It’s also one of the reasons why you might see different style handlebars on different style dirt bikes because you want to make sure you’re comfortable not just sitting down but also when you’re standing up.
The Honda CRF 450 in the image is one of the larger machines in the dirt realm, and while this bike itself might not be the most appropriate one for you to start off with, the beauty of dirt bikes is they come in a plethora of different sizes.
You can start off with something as small as a CRF 50 or you can work your way up throughout the range across pretty much every manufacturer out there so there’s a dirt bike for you and like I said as long as you get somewhere to ride it they’re an excellent machine to start riding on.
Dirt bikes are really a lot of fun this is one of my favorite classes to ride in.
Adventure Bike (ADV)
The next bike is my weapon of choice and that’s an adventure bike also known as an adv bike.
These bikes differ from a dirt bike in several important ways, they’re larger, they’re heavier, they have bigger more powerful multi-cylinder engines and they’re also street-legal so these bikes are the Cadillac of dirt bikes.
They’re kind of enormous but they’re also much more powerful.
You can either look at the adventure bike as just a giant dirt bike or you could look at them as touring bikes with some off-road pretense to it. The adventure bikes aren’t as tall as dirt bikes but keep in mind it’s still pretty damn tall.
At six-foot-three and I’m almost flat-footed on this FA100 but for the shorter riders out there, just keep in mind these might be intimidating as a first machine.
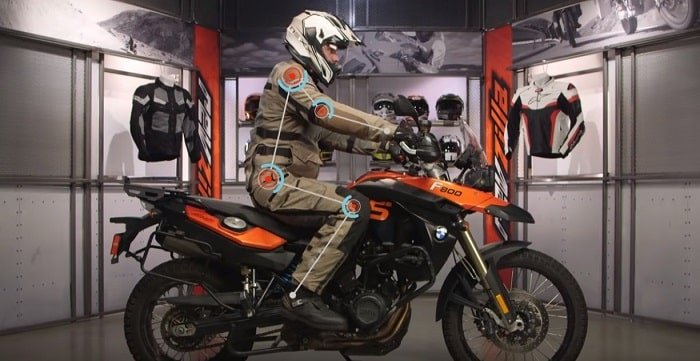
From a rider standpoint when we’re talking about economics the adventure bike is very similar to the dirt bike. It has a wide flat handlebar, your hands will be in front of you, your shoulders on top of your hips and then when you put your foot up on the peg it will sit directly below you.
Adventure Bike
That’s because of a lot of adventure riders out there and if you are going to use this off-road you’re going to spend a lot of time standing up, the same way we talked about with a dirt bike.
Unlike a dirt bike, this seat is much more comfortable because most of the OEMs realized that the majority of riders looking at this style of bike are probably using it for traveling a large number of miles on pavement and therefore you need a more comfortable seat.
One thing to note with this is they are a larger bike, they’re a little bit pricier and most of you out there are probably not going to want to consider the larger sect of ATV machines as your first bike.
However, I have a favorite section in a zone that might be more appropriate for riders out there looking to tackle both on-road and off road and that’s the dual-sport.
Dual Sport Bike
A dual-sport sits squarely between the dirt bike and the adventure bike, think of it as a dirt bike with blinkers. It doesn’t have nearly the amenities or road capabilities of an adventure bike but what it does allow a rider to do is to take a dirt bike onto the street.
This is great for riders who plan on either riding to the trail or riders who want to connect a series of trails with short pieces of pavement in between.
Their Road legal, they have emissions equipment, they also have all of the lighting and inspection items you might need in order to get a sticker onto your bike but you still have most of the capability of a dirt bike.
So What Type Of Motorcycle Should You Get As A Beginner?
Well, that’s actually a really hard question to answer. It’s kinda’ like asking somebody else to tell you what kind of underwear you should wear. There’s a lot of strong opinions on the matter, and just because all your buddies wear tighty-whities doesn’t mean that they’re right for you.
At the end of the day, it’s your butt. But there are some things you may want to consider. First being, what kind of experience are you looking to have?
Thinking about the kind of riding you want to do will help you find a bike that is capable of that. But more important than any of that is just; which bike do you think is the coolest?
Seriously. All your buddies are riding cruisers, but you think the Suzuki V-Strom is coolest thing you’ve seen since Han Solo showed up in the Millennium Falcon: Go with that, she is a helluva ship.
But if you are still unsure, just like everybody loves Firefly, a standard is a great place to start. Being at the center of things, if you find yourself leaning one way or the other, the standard can accommodate you and help you find the kind of riding that you enjoy the most.
If you ride a dirt bike you will know that having a good pair of dirt bike boots can protect you in case of an accident, but which are the best dirt bike boots for you?
Which is the best dirt bike boot? Out of the eight we tested we think the Sidi Crossfire 2 SRS is the best dirt bike boot but that comes with a Price Tag. We have put together a detailed video review of what we consider to be the top 8 dirt bike boots, so you don’t have to.
Click any of the links below for an in-depth review of the best Dirt bike boots mentioned in this video and a few more. We think these are the best dirt bike boots available today and one of them will suit your needs.
There is a $700 difference between my entry-level and premium choices today, so buckle up. First up is the Thor Blitz CE MX Boots (available from Amazon) and it can normally be found for around $130 bucks.
It’s a very basic price tag but I still expect a few things from any dirt bike boot. A steel shank sole and a hard cockpit and those are non-negotiable, in my opinion.
I liked how the shifter panel is just an extension of that hard cockpit, anytime you can avoid stitching two separate pieces together the boot gets stronger for it.
Moving up on the inside we have a big heat shield in case I brush up against the exhaust pipe, it’s also rubberized which is nice to have a grippy contact area for pinching the sides of my bike.
I also really love the brown accent, I just wish that Thor was able to use two different dies on one piece of rubber because this is actually a separate panel that’s stitched underneath the lower one.
On the front, we have a shin plate, also non-negotiable for me, and then on the inside, we have a mesh liner in an elasticated gator. The Blitz isn’t waterproof, motocross boots almost never are, but this Gator does help to keep me dry, and more to the point it prevents sand and mud from dropping in.
So that’s all the stuff I would expect from a motocross boot, even a cheap one like this. I chose the Blitz because it blew away my expectations in a few other areas, the sole is unidirectional so it’s meant to slide forwards if I put my foot down while riding but it also is meant to grip backward while I’m walking.
Moving on there’s a metal abrasion plate on the toe, I’m skeptical about how much this does because this part of my boot just doesn’t see that much action, but the metal looks cool so I like it.
The lower buckle has a raised impact guard in front of it preventing it from getting knocked open while I’m riding, I was surprised that Thor thought to offer that. While I’m talking about buckles there’s only three of them.
They’re made of plastic pretty much what you’d expect from $60 dollars boot. Thor did think to give us two different contact points on the lower one so, it fits just about as precise as a four buckle boot.
Fitment wise it sizes the same as my regular shoes and it feels shockingly light, at sixteen hundred and ninety grams this boot is a few hundred grams lighter than any of the other ones on my list, which is awesome because it’s also much cheaper than any other to my list.
I will say that it’s probably not the most technical fit, I feel like my range of movement is not controlled as much as it could be so that probably sacrifices some safety. Of course, I don’t worry about the build quality or the durability of this boot at all.
Today I have the brand new Thor blitz boot now available in four unique colors. Thor has now added a bit of color to their entry-level boot lineup, these are around $150 which is great because it’s an affordable way to spice up your gear.
Most of the boots in this category are going to only be available in black or white and you’re still getting a really nice quality product.
Four new colors available which are black and red, you have white orange, green black and the Captain America boot so it’s really cool to spice up your gear without hurting the wallet.
So let’s get right into all the great features. Starting on the inside of the boot you have nice protection that wraps completely around to the top of the toe box which is reinforced, and you also have nice reinforcement at the heel for better impact absorption.
You have a three buckle design which is going to be nice because it takes less time to get geared up and this bottom strap actually functions as two. It just reduces the weight of the boot as well and it’s going to give you a nice closure system.
You have velcro at the top so you can really cinch it tight against your leg and you have an elastic Gator for comfort and to prevent elements from going inside of the boot. If we go back to the inner portion you have a synthetic rubber heat guard, so this is going to actually be a grippy texture so it’s going to give you a better contact patch with your motorcycle give me a better feel and control.
The Thor Blitz CE MX Dirt bike Boots have a stitched on the sole, it’s traditional so it can be replaced by a cobbler. It’s reinforced by a steel shank and you have a metal toe cap for extra reinforcement. If we’re going to look at the actual function of the boot you have some stitched areas to give you better mobility, so as this boot breaks in you’re going to also have better riding experience.
Inside you have a mesh liner which is going to circulate air to keep you cool and comfortable and it’s also going to add a comfort level to the inside of the boot as well. One last feature you have it injected molded chin plate to give you a better fit around the leg and it’s going to fit overall much better than other entry-level boots.
Alpinestars Tech 7 Dirt Bike Boots
My favorite middle price boot would be Alpinestars tech 7 which is just shy of $400. When the price jumps on me I expected a lot more technicality, and I’ll show you what I mean. The moving parts on the tech 7 blow away the Thor blitz.
The four buckles are mounted on circular spinners which frees up a little bit of movement to improve comfort. The buckles are also replaceable and they’re made from aluminum. They have this funny Arrowhead design, I mean yeah, maybe slimming down the buckle prevents it from kicking up mud a bit but primarily, I think they just look cool.
On the underside there is a replaceable panel where my footpeg makes contact, I like that because my pegs are sharp and they tend to chew my soles really fast. On the upper there are a lot of moving parts too, you can see that the shin plate is independent of the softer upper underneath it.
That’s just going to free up movement and increase comfort but the big difference between something like the tech 7 and something like the Thor blitz, is the biomechanical pivots.
On the ankles, there is a hinge that allows movement but it gets progressively stiffer and stiffer as you bend towards that limit, and of course, that’s going to prevent hyperextension, similar deal on the back.
The Blitz didn’t have armor paneling at all and I can see again that it’s a technical piece, the lower tongue slides into the upper portion and so it allows your ankle to flex while not allowing for those torsional movements that tend to break bones.
One big safety upgrade which is not a moving part is going to be the foot cockpit, you will see it is one single piece of hard plastic all the way around the boot and so you get 100% coverage where the Blitz only had about 70 percent.
Fitment wise this boot size is just like my regular shoes. I’d say that it’s probably one notch more comfortable than the third blitz, probably because of that extra buckle and the hinges. The tech 7 is heavy though, just under 2 kilos for each of these size 12s which is less than the tech 10 but still chunkier than I’d like.
The calves are also really wide, I’m not able to get a tight seal around my leg and that’s a shame because the chassis on this boot is polyurethane-coated synthetic leather and it would be water-resistant if it weren’t for those big gaps around my cat.
The Alpinestars Tech 7 Dirtbike Boot is going to be the younger brother to the tech ten you’re going to see a lot of similarities with this boot and that’s what we absolutely love about it. Alpinestars has done an amazing job of bringing a boot for an intermediate all the way to pro-level rider under that sub for one hundred dollar mark.
We’re going to talk about the differences between the two but you can see just looking at them, it’s almost hard to distinguish these from a tech ten which we absolutely love. We’re going to break these things down from the inside out so you guys know exactly what you’re getting with the tech seven.
Looking at the tech seven you’re going to see it looks very similar to the tech ten, the theme with these boots is going to be a very narrow profile as well as a very low toe box it’s going to give you great feel and make shifting and braking extremely easy.
We’re going to start with the buckle system on these. Looking at the buckle system it’s the same type of buckle that you’re going to see on the tech ten, they are called the hook and latch system.
These buckles are self-aligning, very easy to use and they do have a bottom strap on top so it’s going to be very difficult for any debris to get in there and lift that up while you ride.
The only real difference in the buckle closure system on the tech seven is you’re going to get four buckles versus three, some people actually like to have a four buckle system so you’re not sacrificing any quality.
Looking at the inside of this boot you are going to have a full Velcro closure system and on the inside, you’re going to have a microfiber gator that is going to help wick away your moisture. It breathes very well and it’s going to dry out quickly.
The biggest difference we said between the Tech 10 and the 7 is there’s no inner bootie in these boots. With the tech ten, you’re going to get a full inner bootie that’s going to give a little bit more ankle support.
Some guys don’t like that full inner bootie, they feel it takes away a little bit of feeling from their footpegs and overall feels the boot while they’re riding.
On the outside you’re going to have a very large shin plate, that’s going to give you that impact resistance. The theme with these boots is going to be a very low profile, very narrow toe box, that’s what they really want to accomplish with these boots is going to make shifting and braking extremely easy.
If we look at the inside the medial side of the boot you’re going to see they use a honeycomb design rubber on the inside, that’s going to be heat and abrasion-resistant so we know these boots are going to stand the test time and they’re going to do the job for you.
The toe of the boot you are going to have a dual compound one-piece injected mold, that’s going to make these boots very durable on the sole. Another great thing that we love about these is with the sub $400 boot you’re still getting a fully removable insert that can be replaced so as these wear out on your footpeg you can get it replaced to extend the life of these boots.
One thing that Alpinestars does that we really like is the entire sole can be replaced through their in-house footwear division, you’d send your boots in, they’ll replace the entire sole making these boots last an extremely long time.
Moving to the back of the boot you’re going to see at the bottom you have a reinforced heel cup that’s going to give you awesome shock absorption as well as protection in any crash. One of the great things that we like is very similar to the tec 10.
Up at the top, you can see they have incorporated a TPU blade system that you would see on the Tech 10. That’s going to give you great flexibility, range of motion, it’s also going to protect you from hyperextension and hyperflexion of the knee and the ankle.
If we go to the lateral side of this boot one of the greatest things about this boot at this price point is you’re still getting a hinge system, that’s going to allow your ankle to flex inside the boot.
If we look at the outside you will see you have a hinge, if you flip it around and look at the inside you have another hinge as well. So you’re getting a dual-hinge that’s going to get a great range of motion, awesome flexibility and it’s going to make the stepping comfort very nice on these boots with little breaking time.
This is the Tech 7 from Alpinestars. Like we said before at this price point with the added built-in safety and quality of this dirt bike boot this is going to be what we feel one of the best boots for any level rider.
Sidi Crossfire 2 SRS Dirt Bike Boots
Now let’s pretend that I have way more money to spend, like eight hundred and fifty dollars worth, then I buy these Sidi Crossfire 2 SRS dirtbike boots that I’ve always wanted. I know $850 is a whole lot of money but, you’re investing in something that’s going to last forever.
The chassis is CDs own techno micro which is kind of like leather except it doesn’t crack too great over time. Of course, the exoskeleton is still going to take a beating which, is why CD designed this boot like Mr. Potato Head.
Replaceable buckles, replaceable ankle armor, replaceable calf armor, replaceable hinge system, replaceable straps, traceable inner plate, parts of the heat shield are replaceable and then on the bottom, this is CDs SR sole which you guessed it, is replaceable.
You can take it off, throw a whole new one on or put on CDs and Duro or supermoto soles to give a whole new purpose to the boot. You can literally rebuild the crossfire season by season.
The boot comes with a Teflon mesh liner, it is more breathable and moisture-wicking than anything else we’ve seen, and the crossfire also has the side vents and the rear exhaust to back it up.
Fitment wise the length is like a regular shoe but the width is narrow, I’d caution people with wide feet away from this boot. Of course, the nice thing about a narrow boot is that it tends to be generally slim on the outside, the Sidi Crossfire 2 is the lowest profile option on my list so it looks great and shifting is really easy with the toe box that load down.
It’s also the most adjustable, I mean this boot can have the widest or the narrowest calf out of any of the options on my list depending on how you set it up. Even the inner gator has two different velcro adjustment straps.
My only complaint is with all the velcro and the buckles and layers, it basically takes three hands to put this thing on. Once I do, I feel more protected and more comfortable in the CDs than anyone else and that’s a really difficult trick to pull off.
Yes, it cost twice as much as the stars, but they last twice as long, they feel five times as good and I get three uses out of them by swapping the soles. If I had the money it’d be worth it to me.
The Sidi Crossfire 2 SRS Boots is their top-level boot. Sidi is an Italian company and they’ve been around a very long time. They definitely know what it takes to make a top-level pro-level boot that you’re gonna see a lot of pro-level riders wearing today.
We’re gonna break these things down from the inside, out we’re gonna talk about all the safety and the durability build it built into these boots and why we think they are one of the best boots available in the offer of the market today so let’s get to it.
First and foremost with any boot, especially a top-level boot like the crossfire 2 – the biggest thing you’re gonna be looking for is protection and stability for your ankle while you’re out riding.
The Sidi Crossfire uses a dual-hinge system so here on the lateral and the medial side you’re gonna have a hinge system that’s gonna allow these boots to flex, they’re also going to protect your ankle from hyperextension and hyperflexion.
These are gonna flex, give you a lot of range of motion, have great stepping comfort and what we really like is on the heel cup. What they’ve done is made this heel cup so that when you put your foot into this boot your heels gonna sit far down in there and that’s gonna give your ankle a natural shape with the leg so you’re gonna get the best performance the best ability out of this boot along with that hinge system.
When we look at the front of this boot, looking at the toe box so you can see the thing with these boots they are very narrow, they’re gonna have a very narrow profile, and they’re very low toe box he’s gonna give you excellent feel light out riding whether it’s braking or shifting.
The toe box is completely covered by a one-piece dual compound very hard plastic material and on the toe box you are gonna have a steel insert so you’re gonna get really good impact protection on the toe box.
What we like is that since it is that one-piece design the only stitching actually comes right around the front of the boot and it’s recessed so you don’t have to worry about that getting snagged or torn and these boots are gonna last an exceptionally long time.
When we look at the buckle system on this boot, what we really like about this buckle system is that the buckles are replaceable so your buckles and straps are replaceable. The buckles are extremely easy to use, self-aligning it’s all you’re gonna do is just take this top strap stick it on and you snap it shut and it’s gonna stay in place for you.
If you look closely you can see that if you do happen to break a buckle. All you have to do is take the screw out, put the new buckle on, screw it in and you have a brand new buckle and you’re ready to go. These buckles are extremely efficient, work extremely well and being replaceable you’re gonna get a lot of life out of these boots with those replaceable parts.
If you look at the front of the boot the front panel is made from a patent material from Sidi, it’s called techno micro. It is more durable and it’s synthetic leather so it’s not it’s going to resist cracking and drying out over time so you’re gonna get a lot of life out of that.
One of the things that I really want to point out is it’s knee braces are becoming more and more common these days and that means that boots have to be adjustable to make sure you can fit these things over any size leg or if you do wear those larger knee braces.
If you look at the inside you can see that they’ve actually made it adjustable so you loosen the three screws, you can adjust these shin plates to make sure that if you do have those bigger legs or if you do wear knee braces they had made this with a ton of adjustability so no matter what size leg you have or knee brace these are gonna fit over your boots just fine.
Let’s look at the inside of this bad boy and see what we find. These boots have a full velcro closure at the top, what we do like is that on the inside the liner is made of two different materials. The upper part is made of can Braille and then the lower part is made of a Teflon mesh.
They know that the most heat is going to be coming at the bottom of this boot where your foot is sitting, so they’ve used that more porous Teflon meshes to make sure it wicks away moisture extremely well.
They have added a lot of protection on the medial side of this boot. The boot has a heat shield. it is a rubber compound that they use that gets stickier in tackier as it heats up. As you’re out riding this is gonna give great contact to the bike and if it gets wet you’re still gonna get a ton of grip out of this heat shield on the medial side.
At the bottom you have an insert that’s going to be very hard thermal plastic, that’s gonna give awesome abrasion resistance having a life of this boot and this piece is replaceable so if this does wear out you can simply buy this new piece take these screws out screw it back in and you’re ready to go.
The shin plate on this boot is another great feature that adds to the durability and the protection. The shin plate is very large, it’s a thermoplastic material, it’s gonna give that impact resistance but the shin plate this medial side for the calf and the calf plate this whole thing comes apart and you can actually replace every single piece of this boot.
That’s why these things last so long, that’s why people really love these is it allows you to interchange pieces as they wear out so if one piece wears out you don’t have to throw them away and get a whole new boot you just replace that one piece and you’re ready to go ride again.
The last thing we’re going to cover what these boots are going to be the sole. Going with the theme of these boots with everything being replaceable the sole is gonna be no exception. so if you look at it on the bottom there is a very hard durable rubber. It is very grippy to the footpegs and the entire sole is held on with screws that go along the entire outside.
The best part is if these do wear out you don’t have to send these boots off anywhere you can simply replace the sole by yourself from your own home and that is an awesome feature about these boots.
Thor Blitz LS Dirt Bike Boots
At last a shorty boot and it’s just fun, I mean it has all the goodies of a motocross boot up to eight inches, and I love that idea. I grew up putting around the trails and messing with pit bikes and doing some light dual sporting and for that, the rock hard MX boot just seemed like overkill so I wore my hikers and I ended up shattering my toe on the trailside stump.
With the blitz LS that wouldn’t have happened. I mean, it’s got plenty of ankle, heel and toe protection while still being lightweight. It’s easy to walk in and it’s not totally unacceptable to walk around town.
The Blitz LS is obviously the child of the Blitz CE. Same brown accent, same buckles, same hard parts, and shifter panels. They have the same interior mesh liner and more or less, they have the same soul.
Someone at Thor must have had a sense of humor though because they’ve added a kick shifting knob to the back of the shorty version. Has anyone ever kick shifted their way into a holeshot while wearing a shorty boot? No, but apparently Thor wants you to try.
A couple of things I don’t like. The chassis is split-grain leather which you might know is fashioned leather, I mean that’s great for slinking down the runway but it’s absolutely useless for sliding down the highway and so if you want to use this shoe for a bunch of payment riding, don’t.
The other thing is the cost. $160 bucks might seem pretty cheap but Thor is also selling their full height blitz CE for basically the same price, so I can’t help but feel like I’m getting ripped off a little bit on the shorty.
The Thor blitz LS Motorcross boot is a great boot and let me tell you why. These things are so great although they offer protection similar to their off-road motocross boot they’re in a smaller package about half the size so they can be worn from many different applications.
Whether you’re riding a quad pit bike, riding some light dual-sport but keep in mind these aren’t waterproof you can even wear these in the UTV scene if you’re looking for protection.
The reason being for that is because they wear like a shoe, they fit like a shoe, and they feel like a shoe. However, you’re gonna get some hard impact protection on the backside of the heel and in the toe box. It’s reinforced in the heel cup as well and you have straps along the top edge of the shoe.
On the inside portion of the boot, you do have a little bit more of heat protection just like an off-road motocross boot with the split-grain leather material on the inside. You do have split-grain leather throughout the rest of the boot so you’re gonna get good impact resistance, abrasion resistance and then you’re gonna have that top protection from the plastic piece on the toe box.
You have a sole that’s very similar to that offroad style boot, a little bit of a lip down here so you can get traction on footpegs and what’s nice about these is that they do come in sizes 7 through 15 so there’s a huge size range there for you.
The back of the boot is notched out just a little bit so if you think about it you’re gonna be in the writing position such as this, this is actually where your Achilles is gonna rest so it’s gonna be a little bit more comfortable it’s not going to dig into your leg as much.
It’s also pretty heavily padded so these will be comfortable, there is a pull loop at the top of the boot so you can get it on a little bit easier and you will see a pronounced heel guard, this is going to give you some protection in the rear of the boot.
These come in two colors, there is the black version they also come in a white so just picture this being reversed everything you see black is white and vice versa. There it is, a very quick look at the Thor blitz LS dirt bike boot. Remember a lot of functions, a lot of diversity and these can be used for many different uses.
Gaerne SG-10 Dirt Bike Boots
Say hello to the Gaerne SG-10 Dirt Bike Boots. This is the baby brother to the SD-12 which the flagship in the Gaerne lineup. One of my favorite facts about Gaerne is they are an Italian company family-owned and operated and all their boots are manufactured right out of Italy. The quality of the construction of material that you’re getting with the Gaerne boots is just second to none. I love the design and the functionality of these boots now.
The SG-10 looks very similar to the SG-12 because it takes a lot of the same design in safety characteristics as the SG-12, there are a couple of key differences that I will point out but you’re coming in about $100 less than the SG-12 so you’re going to save some money.
In my opinion, one of the most comfortable boots when it comes to stepping comfort, pretty stiff boot they’re going to break in overtime but they have memory foam that is around the ankle and I’m telling you, it is like a pillow when you put your foot into this boot.
The construction is very durable, it has a microfiber base and lots of hard PTU throughout the entire boots. You will see the big shim plate over the top of the toe box, you have the panels on top of the foot section which are on your shifter side and your brake side, but again that hard plastic throughout this entire boost so when it comes to impact protection they have got you covered.
If you look to the lateral side you will see a couple of differences. You don’t have an adjustable shin plate on this, the SG-12 does have adjustability with the shim plate. You can make it wider so if you have bigger legs or you wear a knee brace or if you’ve ever had difficulty fitting your leg into a boot keep that in mind with the SG-10 you don’t have that adjustable shim plate.
If you have problems with I would recommend jumping up to the sg-12 because you get more adjustment.
If we look at the buckle design the same as the SG-12 alloy buckles that are replaceable, very easy to operate but you just take your strap, slide it right over so it self aligning and then those are going to snap down they’re not going to go anywhere.
The ankle is going to be one of the major differences I’ve talked about between this in the SG-12. It still has the Razorback system we’ll talk about that in a minute. The SG-12 features are glide plate ankle pivot system, you’re still getting a dual-hinge on each side so good flexibility.
Your ankle is going to stay locked in but it’s not going to glide plate which is designed to give a more natural movement to the ankle. A very solid design, you’re getting that pivoting ankle which a lot of riders are looking for, especially in a premium boot.
If we look at the back there is the Razorback system that I was talking about, they’re incorporating this from the SG-12. You get the shock-absorbing heel cup which is a nice feature for impacts. On the back of the boot, you will see they have the back panel piece which is separate that bolts right onto the boot itself.
If you flex the boot you will see how that works, that allows the boot to be flexible but you’re still getting that rigidity for the lateral stiffness at the same time keeping your ankle in a good position.
What I like is when you wear these boot you don’t have any ankle float so your ankle stays nice and secure on the inside. You also have stretch panels near the back of the ankle, again good comfort good flexibility and again it is going to be stiff and will break in overtime.
As we look at the medial side Gaerne uses the grip guard, this is proprietary to Gaerne. You get a big rubber guard that goes all the way up the inside giving a good heat shield with a good interface with the bike.
Lots of grips when you’re there and again a lot of PU on the inside so they’ve got you covered when it comes to impact and also just durability and quality of the boot.
Velcro closure up at the top, nice big Gator on the top that’s going to give a good seal keeps water and debris out. It has a moisture-wicking antimicrobial liner on the inside, again lots of padding.
The last thing to talk about is the sole. This is another thing that Gaerne is known for. Traditional stitched on sole so it is a little bit stiffer than some of your bonded glued on sole that we see with other boots. If you like a stiffer sole this is going to be a great option for you.
This boot has big stitching that goes all the way around the sole. It’s not glued on, it’s not bonded so it’s going to stay put. A nice big steel toe cap on the front that’s what they’re known for the durability.
If you look at the bottom there is a dual-compound rubber sole, very durable and completely replaceable. If it does wear out you can’t have it taken off and have another one put on. So durability factor again what Gaerne is known for.
If you’re looking at this and the SG-12 wondering which one should I go with there are two things I would point out.
You’re not getting the glide plate system but still a rock-solid dual pivoting design on the SG-10.
Your not getting that adjustable shin plate.
Those are the two sacrifices you’re making, however, those aren’t deal-breakers. You’re going to save $100 bucks going with the SG-10 so head over and check out read the bullet points and check outrider reviews.
Fly Racing Maverik MX Boots
Today we’re going to take a look at the Fly MX Maverik off-road boots. These are the Fly MX Maverik dirtbike boots, they are offered in three colors we have white black and all-black and also a high vis version.
They are available in sizes 7 through 15, I am typically a size 10 across the board in MX boots and size 10 in the maverick fits me perfectly so I would say the sizing is dead-on.
Let’s go ahead and run through all the features that these boots have to offer.
They are priced right, they’re more affordable than others, they’re right at $115 to check the site for more info on the most current pricing and if you’re looking to step it up with the fly racing brand you can check out the sector boots where you’re going to get a little more performance out of them.
You have a lot of 3D molded plastic to keep you protected, they give you great frontal protection with the 3d molded shin plate. The toe box is nicely wrapped and it comes completely over on to the medial side of the boot.
You’re also going to notice a few details like the recess stitching all over the boot that just adds durability and it prevents the strands from being ripped out so it’s going to hold up nicer over time.
On the inside portion of the boot, you’re also going to see a leather heat guard which is nice for heat protection, and you’re also going to see some flex zones throughout, you’re will see them on the top of the foot also in the Achilles area.
These are fairly stiff right out of the box so you will need to break them in but after a few Moto’s you should be just fine. The sole is traditional so is stitched on to the boot, you can have it replaced by a cobbler. You have a steel toe cap and a still shank on the inside of the sole to add rigidity and durability later on down the road.
Another thing that you will notice is the sole is kind of contoured so that you’re going to get a better more aggressive riding position while you are on the pegs.
They use a four strap four buckle design and the straps are memory foam, so you set it once and forget it. The buckles are very easy to get to and easy to operate, you have a little lip on the ends so that’s going to make it better for when you’d have gloves on.
The upper portion of the boot is elastic gaiter which gives a great seal against your leg to prevent debris from making its way inside and you’re also going to see that heat guard go all the way to the top just for some out of protection.
The interior of the boot is really nice, you have a lot of padding in the ankle area for great support and comfort. On the inside portion by the heat guard, it almost feels like you have this gel-like material so again it’s more comfortable and it’s going to give you a little extra protection.
So there you have it, these are the Fly Racing Maverik MX dirtbike boots. If you’re looking for something that’s more on the entry-level side, a little more affordable and a great value definitely check these out. Once again sizing available 7 through 15 and they are offered in three different colors.
Fox Comp Boots
The Fox Comp Motocross Boots are a new entry-level boot from Fox Racing and they’re a great option to get you on the trails or the track. The Cobb boots are coming in at a hundred and ninety dollars, you’ve got a great combination of comfort and flexibility with these boots.
The construction is synthetic leather with TPR and TPU throughout. You’ve got great abrasion resistance as well as impact protection. One thing I did want to note for you is that these are an entry-level boot, these are designed to get you out on the trails and out on the track but you do trade off some rigidity and protection for that all-day comfort.
Before I get too far along with some of these features let’s take a second and talk about the fit. These boots are available in sizes 8 to size 15 and they come in a multitude of different color options.
For reference, I typically wear a ten and a half and most of my boots these aren’t actually offered at half sizes so I’m wearing a size 11 in these boots and they fit me nice and snug. If you’re in between two sizes I’d recommend going with the larger of the two sizes to have a nice accommodating fit.
One thing to note if you do decide to check out these boots in person I’d recommend wearing socks that you’re going to routinely wear with these boots because that is going to have an effect on the fitment.
Jumping back to some of the finer details of these boots you’ll see starting with the sole it works its way up towards the top of the toe and then you’ve got some additional reinforcement, it works its way up towards the back of the heel.
This is not an overly aggressive sole but it’s going to provide you with great grip as well as great impact protection and crush protection at the sole.
The toe is surrounded by TPU and as you work our way back towards the end of the boot there is a TPR and you will see that there is a grip pattern that’s been molded into the TPR.
Its a really nice touch that allows you to more easily grip your frame which is super important when you’re riding in that dirt application.
There is a single buckle closure towards the bottom and then you will there are some additional closures at the top, this is referred to as the active lock closure from fox. This is new and this is where you’re going to get a lot of the flexibility that this boot provides.
As you open the buckle you will see they’ve got some flexibility but they are adjustable so you do have three points of adjustability on the inside.
This dirt bike boot has bellows towards the front so you’re getting flexibility there as well. You’ve got that movement with these active closure straps and you’ve got that movement with the bellows so you get that flexibility and that’s we’re going to get a lot of that all-day comfort.
Moving from the exterior of the boot to the interior you’ll see that you have a ton of 3D mesh throughout the entirety of this boot. This is going to promote airflow and keep you nice and comfortable when you’re riding in the dirt application.
You’re also going to see that we have a speed lace system, this is not removable but it’s very enclosing it’s very comfortable to wear and it’s going to help the boot and not shift around on you when you’re out there hitting the trails.
The details like that, the flexibility, the comfort these boots provide is going to make these a great entry-level boot.
So there you have it, a new entry-level boot that can get you to the trails or the track with great movement and flexibility.
Gaerne GX-1 Boots
The Gaerne GX1 Motorcross Boots is one of our favorite models in our line and they made some really nice changes to it over the earlier version.
First, let me hit the basics of the GX-1, the first and most important thing that we want to talk about is we don’t know how they do it but they do it Garen a makes this boot in Italy. It is something that is really hard to find at this price point.
The Italians just have a better way of building a boot, a better feel, better materials better fit, all these things are intangible but trust us when you get boots that are made in Italy they just feel a little bit better on your feet out on the bike.
At this price point, this boot retails for around $199 and it comes to the sizes 5 which is a 37 all the way up to size 14 which is a 49 so a big size spread.
They come in two colors, black, white, our favorite is of course black. The construction of the GX-1 is pretty basic is the most classic version of motocross boot with four buckles. Their buckles are a really nice durable and simple male/female pass-through design.
They work very well whether they’re dirty or clean they’re very easy to adjust and they’re very easy and inexpensive to replace. However, we don’t believe that you’ll need to do that because our experience has been they’re really rugged.
The second thing to talk about in the GX-1 is the fact that it is a welt sole which is another thing that is also difficult to find at this price point. Well, soles are a more difficult technical and longer-lasting more rugged way of producing a boot and the GX-1 has a wealth sole.
This one is quite durable, quite rugged and very long-wearing and of course, it can be resold. There’s a lot of plastic protection around the exterior of the GX-1, of course, it has a large plastic shin plate. It has the typical large inside ankle plastic keys wrapping over the toe all the way up around the inside of the ankle and of course forming the straps for the boots.
It has also a nice plastic protector on the back of the calf and a nice plastic heel counter with a small little reinforcement.
The nice thing about the plastic compound, it is a more expensive plastic polyurethane instead of polyethylene or polypropylene. It’s got a nice soft pliable feel to it, which makes the boot very comfortable and it still gives good support but makes it very comfortable and this is something you typically don’t find on this price point of the boot.
There’s a good amount of inside padding on the boot, it starts just above the ankle right in center zone and then runs down on both sides along the ankle and that helps hold the ankle in place and gives it really good support.
The weight of the boot is about 3.8 pounds which is pretty light for a motocross boot, that’s on the lighter side. No other boot brand does as good a job as they do at making a boot fit and feel good, we feel that guarantee really is the top rung of the ladder when it comes to fit. The GX-1 definitely follows along with that.
It’s got a nice slim fit through the ankle and in the heel area and a nice wide fit in the forefoot. The toe box is not too tall, it doesn’t have a lot of extra volumes, it’s got a really nice shape to it but there’s plenty of width in the forefoot and this boot just feels right when it’s on. That along with the soft pliable plastic give it a really good flex.
The new GX-1 has a softer compound to the inside plastic piece and the cutouts on it are much larger and much more intelligently shaped. This just has a nice uniform easy flex to it, a much better feel and no pinch or bite on the boot.
The rest of the design of the boot is fairly similar to the older version which is excellent. They are super rugged, the wearability that durability this boot is just one of the best that we have seen. We have customers that have had them for many years and we’ve had customers spent a lot of time out on the trail and on the bike in them and they just really hold up very well.
The protective characteristics are also quite good, it’s got a lot of support it’s particularly good at this price point. The other thing about this boot is really good is the walkability, it is fairly light again 3.8 pounds for a size 11 which is a 46 that is on the lighter side of motocross boots and the soft plastic gives us a nice easy flex.
This is a great boot for people that are getting off the motorcycle and need a little bit of walking but still require a bit of protection. This boot is great for casual off-roaders, more serious off-roaders, great for dual-sport guys, great for guys doing light adventure, people that are going off-road on bigger bikes and really shouldn’t be wearing an adventure touring boot.